How to jump start your motorcycle


0 min. read
Just like cars, your motorcycle battery gets weaker with time, and can sometimes leave you stranded. If you know how to properly jump start your motorcycle battery, you can get back on the road—and get to a safe location to diagnose and fix the underlying issue.
If you have jumper cables—ideally 10- to 6-gauge jumper cables—you can jump your motorcycle with a car or another motorcycle. Another alternative is a battery jump pack, which doesn’t require a second vehicle.
We’ve laid out the process below, step by step:
Prepare to jump start your motorcycle
Move your motorcycle to a flat, stable area where you can park it safely.
Check your owner’s manual to confirm the location of your battery. Typically, it’s under the seat or behind the side panels, which can be removed with basic hand tools.
Inspect your battery for damage. If there’s obvious damage, stop the process here. You’ll need to trailer your bike to your shop or a mechanic.
Jump starting your motorcycle with a car
Position the booster vehicle’s battery as close to your motorcycle’s battery as possible, while still being able to safely maneuver around them.
With neither vehicle running, connect the cables in the following order:
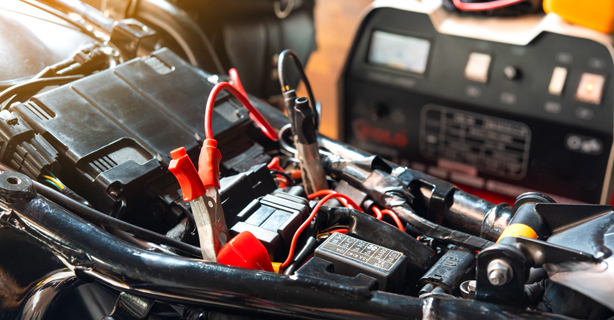
Red (positive) clamp to the positive (+) terminal of your dead motorcycle battery—red to dead.
Other red clamp to the positive (+) terminal of the booster vehicle.
Black (negative) clamp to the negative (-) terminal of the booster vehicle.
Other black clamp to a piece of unpainted metal on your motorcycle away from the battery, like an exposed bolt or the chassis.
Start your motorcycle and let it run for 3–5 minutes, but don’t start the car. The power from the car’s battery is sufficient to jump start the battery while it’s not running.
While your motorcycle is still running, carefully remove the cables in the opposite order you attached them: black off bare metal, black off booster vehicle, red off booster vehicle, red off your motorcycle.
Ride your motorcycle for at least 15 minutes to recharge the battery.
Jump starting your motorcycle with another motorcycle
Follow steps 1-3 of “Prepare to jump start your motorcycle,” then continue with the steps below:
Position the motorcycles close enough to each other that your jumper cables reach comfortably.
With neither motorcycle running, connect the cables in the following order:
Red (positive) clamp to the positive (+) terminal of your dead motorcycle battery—red to dead.
Other red clamp to the positive (+) terminal of the booster motorcycle.
Black (negative) clamp to the negative (-) terminal of the booster motorcycle.
Other black cable to a piece of unpainted metal on your motorcycle away from the battery, like an exposed bolt or the chassis.
Start the booster motorcycle and let it idle for several minutes.
Start your motorcycle. If the engine isn’t kicking in right away, let the booster motorcycle idle for a couple more minutes before trying again. Once it starts, leave both motorcycles running for 3–5 minutes.
With both bikes still running, carefully remove the cables in the opposite order you attached them: black off bare metal, black off booster motorcycle, red off booster motorcycle, red off your motorcycle.
Ride your motorcycle for at least 15 minutes to recharge the battery.
Jump starting your motorcycle with a jump pack
Follow steps 1-3 of “Prepare to jump start your motorcycle,” then continue with the steps below:
Make sure the jump pack is set to the same voltage as your bike’s battery.
With both your motorcycle and the jump pack off, connect the clips to the battery:
Red (positive) clip to the positive (+) terminal of your dead motorcycle battery—red to dead.
Black (negative) clip to a piece of unpainted metal on your motorcycle, away from the battery, like an exposed bolt or the chassis.
Turn on the jump pack and push the starter of your motorcycle. If the engine doesn’t kick in after 2–3 seconds, leave them connected for a few more minutes and try again.
Once your motorcycle starts, carefully remove the clips in the opposite order you attached them: black off bare metal, red off your motorcycle.
Ride your motorcycle for at least 15 minutes to return charge to the battery.

Diagnosing your dead motorcycle battery
Once you’re safely back in your garage after jump starting and riding your motorcycle, you’ll want to figure out if your battery is salvageable or if it’s time to replace it.
Let your motorcycle rest for at least one hour before performing any tests on your battery.
Your motorcycle battery has an acceptable range of voltages where it will function properly. Load testing your motorcycle battery will allow you to read how much voltage your battery is giving off.
If a fully-charged battery reads in the acceptable range—typically between 12.4 and 12.6V for a 12V battery—it just needs to be recharged.
If it reads between 12.0 and 12.3V, your battery’s lifespan has decreased and it’s time to think about replacing it.
If it reads 11.9V or below, you should replace the battery right away.
If you want to avoid removing your battery every time you need to load test or charge it, you can install a motorcycle battery tender pigtail, which gives you easy access to the terminals without opening up your bike.
Motorcycle battery maintenance
You can prolong the life of your motorcycle battery by keeping up with standard maintenance tasks. In some cases, these tasks are specific to the type of motorcycle battery you have. Check with the manufacturer for detailed care instructions.
Keep your motorcycle battery charged
Riding your motorcycle charges the battery automatically. When you’re not using the motorcycle or the battery is in storage, it naturally loses its charge. To prevent a dead battery, charge it regularly—either with a compatible battery charger or a trickle charger.
You can use a motorcycle-specific battery charger monthly to fully charge the battery before disconnecting it again. Overcharging the battery, either by leaving it connected too long or using a car battery charger, can also be harmful to the battery.
Most modern trickle chargers, in contrast, can be left on your battery indefinitely. They are designed to give current to the battery when it’s below 100% and will shut off when not needed.
Remove your battery when your motorcycle is in storage
Leaving the battery dormant in the motorcycle can negatively impact its charging ability—it will likely be completely dead when you try to start your motorcycle again. A dead battery can be recharged, but it may take up to 24 hours on the charger.
When not in use, store the battery in a warm, dry place on a non-conductive surface. Metal or concrete surfaces and extreme cold temperatures can speed up the self-discharge process.
Check your motorcycle battery fluid monthly
If you have a flooded lead acid battery—the lowest upfront cost and common in older bikes—the fluid in your battery will evaporate over time. Other battery styles are completely sealed and don’t require this type of maintenance.
If the fluid is low, you can take the battery to a motorcycle technician to help refill it. If you’re doing it on your own, make sure to wear a mask, gloves, and safety glasses. In a ventilated area, open the reservoir and top off with distilled water.
Related resources
The general information in this blog is for informational or entertainment purposes only. View our blog disclaimer.


